Introduction: A Compressed ECU Firmware Challenge
In this article, we explore a real-world case of custom ECU firmware decompression in a heavy-duty truck. The original firmware was extracted in compressed form, requiring a tailored reverse engineering approach.
An independent vehicle workshop encountered a puzzling issue with a heavy-duty truck’s Engine Control Unit (ECU). The truck (a DAF-branded commercial vehicle, for anonymity we’ll call it “AlphaTruck”) had an engine ECU model we’ll refer to as VECU-208. This ECU is built around an NXP/Freescale PowerPC MPC55xx series microcontroller, a common choice in automotive systems (reverseengineer.net) The technician managed to extract the ECU’s memory via the onboard diagnostics (using UDS protocols over the OBD port), only to find that the main flash firmware dump was compressed in an unknown format. In contrast, the accompanying EEPROM dump (containing configuration data) was uncompressed and readable.
The key question: How can we decompress the ECU’s flash firmware to obtain a usable image for analysis, diagnostics, or tuning? This case study walks through the reverse engineering process used to tackle that challenge.
The Scenario: Only Compressed Firmware Available
The Initial Problem: The ECU’s flash memory (which stores the main program code) was retrieved using a Unified Diagnostic Services (UDS) request – specifically a routine akin to service 0x35 (Request Upload) with certain parameters (for example, SID 35 01 44). The result was a binary file (let’s call it FLASH_comp.bin) significantly smaller than expected. Attempts to read it as plain data showed no meaningful text or recognizable code. By contrast, the EEPROM (a smaller memory storing calibration and VIN data) was extracted uncompressed, and contained readable parameters. This suggested that either:
- The ECU stores its flash content in a compressed form internally, and likely decompresses it at runtime (e.g. at boot, possibly loading into RAM), or
- The diagnostic readout process itself applied compression to the data before sending it out, to reduce transfer time or data size.
Why Compress an ECU Firmware? Automotive manufacturers sometimes compress firmware for efficiency. For instance, compressing data can speed up over-the-air or dealer programming by transmitting a smaller amount of data and then decompressing it inside the ECU. In other cases, compression (or encryption) is used as a form of protection or obfuscation, making it harder for outsiders to interpret the code. It’s not uncommon for OEMs to employ custom compression algorithms (LZSS, Huffman coding, run-length encoding, etc.) as part of their firmware protection strategy (reverseengineer.net). In our case, the compressed flash dump hinted that one of these techniques was at play.

Goals: The technician’s goal was clear – decompress the flash firmware to get a normal, bootable image. This would enable:
- Diagnostics & Debugging: analyzing the code for faults or DTC (Diagnostic Trouble Code) strategies.
- Customization: possibly editing parameters or making performance tweaks (common in tuning or retrofitting scenarios).
- Reprogramming/Cloning: writing the firmware to a replacement ECU or modifying it and flashing it back.
But with the data in a mysterious compressed form, none of these could proceed. The following sections describe how we approached the reverse engineering of the compression.
Reverse Engineering the Compression Algorithm
Analyzing the Compressed Dump for Clues
First, we examined the raw bytes of FLASH_comp.bin to gather clues about the compression format:
- No Standard Headers: The file did not start with familiar signatures like
0x1F 8B(gzip),0x50 4B(ZIP), or other known compression file markers. This implied a custom or embedded compression format, not something immediately recognizable by tools likebinwalkor7-zip. Runningstringson the binary produced gibberish – any ASCII text (like error messages or part numbers) was fragmented or unrecognizable, a strong sign the data was indeed compressed (and not just encrypted. In a normal firmware dump, one would expect to see some readable strings (for example, software version IDs, or ASCII identifiers), but here,stringsoutput looked like random characters and broken pieces of text. - Size and Patterns: The compressed flash dump was significantly smaller than the flash’s actual size (as later confirmed by an uncompressed read via JTAG). This compression ratio gave a hint that a genuine compression algorithm (likely lossless, such as LZ-type compression) was used. When viewing the binary in a hex editor or even converting it to a grayscale image (a trick to visualize data patterns), we observed sections of repeating values and non-uniform structure rather than a flat random entropy. For example, large blocks of
0xFF(padding bytes) separated segments of data. This suggested the dump might be divided into compressed chunks, each possibly padded to alignment boundaries with 0xFF. If the ECU’s memory was read in segments, each segment could have been compressed independently. - Known Data in EEPROM vs Flash: We compared the contents of the uncompressed EEPROM dump with the compressed flash. Certain calibration constants or identifiers present in EEPROM (like vehicle IDs or known default values) should also appear in the flash program memory (in tables or reference data). In the compressed flash dump, we searched for these known byte sequences. They were not directly found, which further confirmed that the flash content wasn’t just XOR-obscured or shifted – it was truly algorithmically compressed.
These observations pointed to a custom compression scheme, likely tailored for the ECU’s firmware. The presence of chunking and repetition patterns hinted it could be a form of LZ77/LZSS (sliding window) compression or something with a static dictionary. Many automotive ECUs use similar approaches in their update protocols. We hypothesized that the ECU’s bootloader (or a second-stage loader) was responsible for decompressing this data during normal operation. In fact, some systems are designed such that a small boot code in flash copies a compressed program into RAM and decompresses it before execution. This could explain why the on-disk (on-flash) representation was compressed.
Identifying the Compression Logic
With the strong suspicion of an LZ-type compression, we proceeded systematically:
- Search for Compression Markers: We looked at the beginning of each data chunk in the file. Often, compression algorithms have per-chunk headers that store lengths or flags (for example, a 2- or 4-byte value indicating uncompressed and/or compressed length). Indeed, at the start of the file (and at offsets corresponding to boundaries between padded 0xFF blocks), we found what looked like length fields – a consistent 2-byte and 4-byte pattern that could represent sizes or offsets. For instance, one chunk began with bytes that, interpreted as big-endian, equaled the value of 0x40000 (256k decimal), which was suspiciously equal to a known flash segment size. This was a clue that these bytes could encode the uncompressed chunk size.
- Control Bytes and Bit Flags: We attempted to decode parts of the data as if it were LZSS. Typically, LZ-family compression uses control bits to indicate literal bytes vs back-references. For example, one common scheme is that a single byte acts as a flag mask for the next 8 items: each bit being 1 means a literal byte follows, and 0 means a length-offset pair follows. By manually interpreting a section of the data with this assumption, we started seeing meaningful output. In one segment, after applying a suspected control byte, the next few bytes interpreted as ASCII gave plausible text (parts of what looked like a software version string). This increased our confidence that we were on the right track.
- Dictionary or Table: Some compression formats include a predefined dictionary or use the file’s own data as a dictionary. We looked for any static tables in the compressed file – for instance, a block of data that might be a Huffman tree or literal table. Nothing obvious stood out, which leaned more towards an LZ77/LZSS variant (which typically doesn’t have a static table like Huffman does, but dynamically builds it from past data).
- Comparing to Uncompressed Reference: In a fortunate turn, we managed to obtain an uncompressed flash dump of the same ECU by connecting to the microcontroller’s JTAG interface (this required advanced access, bypassing certain protections). This FLASH_jtag.bin was the raw 4 MB flash content. Now we had a ground truth to compare against the 2 MB compressed file. By aligning both dumps, we could see how specific sequences were represented in compressed form. For example, a sequence of 16 identical bytes in the uncompressed firmware corresponded to just a few bytes in the compressed file (indicating an encoding of “repeat this byte 16 times”). Another example: a particular function’s ASCII identifier (present in the code) was intact in uncompressed form and appeared as a scattered subset of bytes in the compressed form, consistent with LZ-style tokenization (literal fragments separated by back-reference tokens).
From these steps, we deduced that the algorithm was likely a custom LZSS compression (Lempel-Ziv-Storer-Szymanski) with fixed 2-byte tokens for back-references (one byte for [length+offset] info, one byte for offset, as is common in many embedded LZ implementations). The chunking suggested that the firmware was divided into sections (perhaps corresponding to memory sectors or functional blocks) that were compressed individually possibly to allow random access or to update portions independently.
Reconstructing the Decompression Method
Once we theorized the compression format, we proceeded to implement a decompressor. Our plan was to write a script that could convert the compressed .bin back into the original firmware image automatically. Key tasks in this implementation:
- Parse Chunk Headers: Read the initial bytes of each chunk to determine the uncompressed length (and sometimes compressed length). Allocate a buffer for the output of that chunk.
- Iterate Through Compressed Stream: Use a pointer to walk through the compressed data bytes. Maintain an output buffer pointer for writing decompressed bytes. We used a bitmask technique to read control bits:
- Read a control byte (e.g.,
0x5Cwhich in binary is01011100). - For each bit (LSB to MSB) of this control byte:
- If the bit is 1: interpret the next byte as a literal and copy it directly to output.
- If the bit is 0: interpret the next two bytes as a compressed token (length-distance pair). For example, combine them into a 12-bit length and 4-bit offset (or similar) or vice versa, then copy that many bytes from the already decompressed output (sliding window back-reference). The exact encoding had to be figured out by trial and error with reference to the known uncompressed data.
- Continue until we have produced the expected number of output bytes for that chunk (which we got from the header).
- Read a control byte (e.g.,
- Handle Edge Cases: If a chunk’s compressed data ended early (e.g., due to padding alignment with 0xFFs), ensure the decompression stops at the correct point. We also handled special cases like a control byte indicating more literals than remaining bytes (which might happen at the end of a chunk).
After some debugging, we got the script to produce an output file. We then cross-verified this output with the known good JTAG dump. It matched exactly (byte-for-byte), confirming that our reverse-engineered decompression was successful. Furthermore, the checksum present in the firmware (a CRC stored in a specific flash address, used by the ECU to verify integrity) was correct on the decompressed image a strong sign of success.
Developing the Decompression Tool
With the algorithm understood, we refined the solution into a more user-friendly tool. We chose Python for its ease of writing binary parsing logic, though a C implementation could be integrated into diagnostic tools later. Here’s an outline of how the decompressor was implemented:
- File Input/Output: The tool accepts a compressed
.binfile (like our FLASH_comp.bin) and outputs a decompressed.bin. It reads the entire compressed file into memory (since it was only a couple of megabytes – manageable for a PC). - Chunk Processing Loop: Iterate over the file data. For each chunk:
- Read chunk header to get
uncompressed_size(and possiblycompressed_sizeif encoded). - Initialize an output buffer (bytearray) for this chunk.
- While output buffer length < uncompressed_size:
- Read a control byte.
- For each bit in the control byte (until you have produced
uncompressed_sizebytes or exhausted chunk data):- If bit==1: copy the next one raw byte from input to output.
- If bit==0: read the next two bytes as a compressed reference token. Decode the length and offset from these bytes. Then, copy
lengthbytes fromoutput[-offset](offset from back) to the end of the output (this may involve copying from data that was just written, which the algorithm handles gracefully).
- Move to the next chunk (taking into account any padding that was present).
- Read chunk header to get
- Combine Chunks: Either write chunks to separate files or combine into one continuous output file (in this case, since it was contiguous firmware memory, we combined them in correct order to recreate the full flash image).
- Verification (optional): Compute CRC32 or other checksum of the output, if the firmware’s expected checksum is known. (In our project, we knew the expected CRC from the EEPROM data and verified it matched).
For example, running the tool looked like this:
Figure: Running the custom Python decompression script on the compressed dump, then hexdumping the first few lines of the decompressed output. The output now shows readable patterns e.g., ASCII strings like a part number and version ("RX3818 V4.22..." in this test) appear, confirming successful decompression
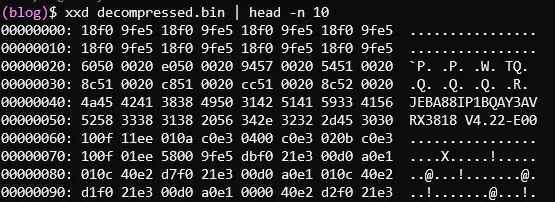
The above snippet (from our testing) illustrates that once decompressed, the firmware image contained meaningful data in this case, a version string and other identifiable bytes whereas before, the compressed file had none of these in clear form. This gave the workshop engineer the ability to inspect and modify the firmware as needed.
Outcome and Lessons Learned
After developing the decompressor, the VECU-208 firmware was successfully reconstructed in its original, uncompressed form. The technician could load this firmware into analysis tools (like Ghidra or IDA Pro) and locate key functions and tables. It enabled them to perform advanced diagnostics and even apply minor modifications for a performance tuning project. Additionally, having the uncompressed image made it possible to clone the ECU’s software onto a donor ECU (useful in scenarios where an ECU is damaged and needs replacement without dealer tools).
Key takeaways from this case:
- Custom Compressions in ECUs: This project underscored that not all ECU dumps are straightforward memory reads. Manufacturers may compress firmware in the ECU or during readout to save space or time. Always consider this if a firmware dump looks “unintelligible” it might not be encrypted or corrupted, just compressed with a custom algorithm.
- Reverse Engineering Approach: The combination of pattern analysis and cross-referencing with known data is powerful. We leveraged a known-good image (via JTAG) to confirm our theories, but even without it, the process of deducing format from patterns and testing hypotheses bit-by-bit was effective. As seen in similar reverse engineering scenarios, sometimes analyzing the data format directly can yield results faster than diving straight into disassembling code.
- Tool Development: We created a re-usable Python tool for this compression format. This means if any other ECUs (perhaps of the same manufacturer or same microcontroller family) use the same compression scheme, we can readily decompress their dumps too. The script-based approach also allows quick adjustments if a variation of the algorithm is encountered (for example, a different window size or token encoding).
- Validation: Always validate the decompressed output. In our case, internal checksums and known strings were used to verify that the output was correct. This is critical because when dealing with custom algorithms, it’s easy to misinterpret a length field or bit order, which could produce a plausible-looking output that’s actually wrong. Matching the ECU’s own checksum gave us high confidence.
Conclusion: From Challenge to Solution
What began as a perplexing challenge, a firmware dump that looked like nonsense, turned into a successful reverse engineering exercise. By systematically analyzing the compressed data and understanding the ECU’s use of a custom LZ-based compression, we developed a tailored solution. The compressed .bin file was transformed into a usable firmware image, enabling diagnostics and custom modifications that were not possible before.
For small workshop engineers, independent ECU technicians, and reverse engineers, this case study highlights the importance of adaptability. When standard tools fail (e.g., when binwalk and other extractors find nothing, don’t assume all is lost. It may be a proprietary format that yields to a combination of detective work and programming.
If you encounter a similar situation, perhaps an unfamiliar ECU dump or a module that seems “bricked” due to inaccessible firmware consider the possibility of hidden compression or encryption. With the right approach, these obstacles can be overcome.
This case also demonstrates our expertise in tackling such problems. If you have a compressed or encrypted automotive firmware that you need to make sense of, feel free to reach out. Our team has experience with a variety of microcontrollers and compression algorithms, and we’re here to help unlock the data you need.
Lastly, remember that every ECU (even within the same brand) might do things a bit differently. Reverse engineering is often about observing and adapting. In this story, the solution was a custom decompressor – in another, it might be an emulator or a different algorithm. Keep an open mind, use all available clues, and methodically work through the problem. The result can turn a block of mysterious bytes back into the software you can understand and improve.
Let's Work Together
Need Professional Assistance with Reverse Engineering or Cybersecurity Solutions? Our Team is Ready To Help You Tackle Complex Technical Challenges.