Why Ghidra for Automotive ECU Analysis?
Ghidra, the open-source reverse engineering framework developed by the NSA, has become the tool of choice for automotive ECU firmware analysis. While IDA Pro dominated the reverse engineering landscape for decades, Ghidra ECU analysis offers something IDA cannot: a fully functional decompiler for the Infineon TriCore architecture, which powers the vast majority of modern automotive ECUs. This single advantage makes Ghidra indispensable for anyone working with Bosch, Siemens, and Continental engine management systems.
Beyond the TriCore decompiler, Ghidra provides built-in scripting (Java and Python), cross-reference analysis, collaborative project support, and advanced binary comparison through BSim. All of this comes at zero cost, making Ghidra ECU analysis accessible to independent researchers, tuning professionals, and security auditors who cannot justify IDA Pro’s five-figure licensing fees.
This guide walks through the complete Ghidra ECU analysis workflow: from installation and TriCore processor configuration to loading firmware binaries, navigating decompiled code, identifying calibration maps, and building repeatable analysis scripts.
Ghidra vs IDA Pro for ECU Firmware Work

Both tools have their strengths, but for automotive ECU work, the comparison is clear:
| Feature | Ghidra | IDA Pro |
|---|---|---|
| Price | Free (open source) | $2,800+ (Tricore plugin extra) |
| TriCore disassembly | Built-in (TriCore, AURIX TC3xx) | Requires third-party plugin |
| TriCore decompiler | Yes, fully functional | No native support |
| Scripting | Java, Python (Jython/Pyhidra) | IDAPython, IDC |
| Collaboration | Ghidra Server (built-in) | Lumina (cloud-based) |
| Binary comparison | BSim (excellent for ECU work) | BinDiff (third-party) |
| Processing speed | Slower (20-30 min for large ECU bins) | Faster initial analysis |
| Community plugins | Growing (open source ecosystem) | Mature (decades of plugins) |
For TriCore-based ECUs like the Bosch MED17, EDC17, MD1, and MG1 families, Ghidra is the clear winner. The ability to decompile TriCore machine code into readable C-like pseudocode transforms weeks of assembly analysis into days of structured code review. For a deep dive into these ECU platforms, see our Bosch MED17 and EDC17 Reverse Engineering Guide.
Installation and TriCore Processor Setup
Getting Ghidra ready for ECU analysis requires a few specific steps beyond the standard installation.
Step 1: Install Ghidra
Download the latest release from the official Ghidra GitHub repository. Ghidra requires a Java Development Kit (JDK 17 or later). Extract the archive, run ghidraRun.bat (Windows) or ghidraRun (Linux/macOS), and you are ready to start.
Step 2: Verify TriCore Support
Ghidra includes TriCore processor support out of the box since version 10.0. To verify, create a new project, go to File > Import File, and check the Language dropdown. You should see multiple TriCore variants:
- TriCore:LE:32:default for standard TriCore 1.3/1.6 processors (TC1767, TC1797)
- TriCore:LE:32:tc2xx for AURIX TC2xx series (TC275, TC277, TC298)
- TriCore:LE:32:tc3xx for AURIX TC3xx series (TC375, TC377, TC397)
Selecting the correct processor variant is critical for accurate Ghidra ECU analysis. The TC1797 is common in older MED17/EDC17 units, while TC277 and TC298 appear in newer MD1/MG1 platforms.
Step 3: Memory Map Configuration
ECU firmware binaries are not standard executables with headers that tell Ghidra where to load code and data. You need to define the memory map manually based on the target microcontroller’s architecture:
| Memory Region | Address Range (TC1797) | Purpose |
|---|---|---|
| PFLASH (Program Flash) | 0x80000000 – 0x801FFFFF | Main firmware code and calibration data |
| DFLASH (Data Flash) | 0xAFE00000 – 0xAFE1FFFF | EEPROM emulation, adaptation values |
| DSPR (Data Scratch-Pad RAM) | 0xD0000000 – 0xD000FFFF | Fast local data memory |
| PSPR (Program Scratch-Pad RAM) | 0xC0000000 – 0xC0007FFF | Fast local program memory |
| Peripheral registers | 0xF0000000 – 0xFFFFFFFF | CAN, SPI, ADC, timer hardware registers |
In Ghidra, open the Memory Map window (Window > Memory Map) and add each region with the correct start address, size, and permissions (Read/Write/Execute). The PFLASH region should be marked as Read + Execute, while DFLASH and RAM regions should be Read + Write.
Loading ECU Firmware into Ghidra
ECU firmware typically comes as a raw binary dump obtained through JTAG, BDM, boot mode, or CAN-based extraction. Unlike ELF or PE files, raw binaries have no metadata, so you must tell Ghidra how to interpret the file.
Raw Binary Import
When importing, select “Raw Binary” as the format and choose the appropriate TriCore language variant. Set the base address to match your memory map (typically 0x80000000 for PFLASH dumps). After import, Ghidra will not automatically find code because there are no entry point headers. You need to identify the entry point manually.
Finding the Entry Point
TriCore processors start execution at the Boot Mode Header (BMH) table located at a fixed address. For TC1797, the reset vector is at 0x80000020. Navigate to this address in Ghidra, right-click, and select “Disassemble”. Then press “F” to create a function at the entry point. This tells Ghidra to begin analyzing code flow from this location.
Using Loader Scripts
For repeated Ghidra ECU analysis across similar platforms, custom loader scripts automate the memory map setup and entry point identification. The Ghidra community has developed TriCore-specific loaders that parse the BMH table, identify the ASW (Application Software) and calibration partitions, and set up the memory layout automatically. Writing or adapting a loader script saves significant time when analyzing multiple ECU variants from the same family.
Navigating ECU Firmware in Ghidra
With the firmware loaded and initial analysis complete (expect 20-30 minutes for a 2MB MED17 binary), Ghidra presents the disassembled and decompiled code. Here is how to navigate effectively.
Function Discovery
After disassembly, Ghidra’s auto-analysis identifies thousands of functions. A typical MED17 firmware contains 3,000-5,000 functions. Most will have auto-generated names like FUN_80012a4c. Your job is to identify and rename the important ones. Start with:
- Cross-references from known addresses: If you know the CAN receive handler address from CAN bus reverse engineering, navigate to it and trace the call chain.
- String references: Press Ctrl+Shift+E to open the Strings window. Search for diagnostic strings, DTC codes, or calibration labels. These strings lead to the functions that use them.
- Interrupt vectors: TriCore interrupt vector table entries point to critical system functions like CAN interrupt handlers, timer ISRs, and watchdog routines.
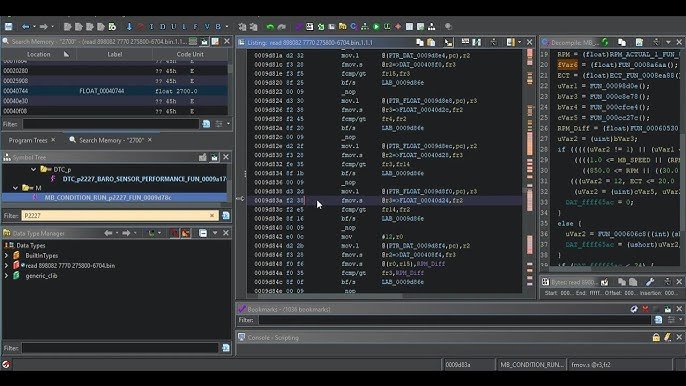
The Decompiler Window
The decompiler is the most powerful feature for Ghidra ECU analysis. Select any function in the listing, and the Decompiler window shows C-like pseudocode. For TriCore firmware compiled from Bosch’s model-based design tools (ASCET or Simulink-generated code), the decompiled output closely resembles the original auto-generated C code. This makes it possible to understand calibration map lookups, sensor scaling calculations, and control algorithms without reading raw assembly.
Key decompiler tips for ECU work:
- Retype variables: Right-click a variable in the decompiler and select “Retype Variable”. Change generic
inttypes to meaningful structs or typedefs. This dramatically improves readability. - Set function signatures: If you know a function takes a pointer to a calibration map, set the parameter type accordingly. The decompiler will propagate this information throughout the code.
- Use “Commit Locals”: After renaming and retyping variables in the decompiler, commit them to preserve your changes across analysis sessions.
Need help analyzing ECU firmware in Ghidra? Our team specializes in TriCore firmware reverse engineering for Bosch, Siemens, and Continental ECU platforms. Learn about our ECU reverse engineering services.
Identifying Calibration Maps and Tables
One of the primary goals of Ghidra ECU analysis is locating and understanding calibration data: the lookup tables and maps that define how the ECU controls fuel injection, ignition timing, boost pressure, and hundreds of other parameters.
How Calibration Maps Work in ECU Firmware
Automotive ECUs use 1D curves (single-axis lookup), 2D maps (two-axis lookup), and scalar constants to define their control behavior. In firmware, a typical 2D map consists of:
- An X-axis array (e.g., engine RPM breakpoints)
- A Y-axis array (e.g., load/pressure breakpoints)
- A data table (the output values at each intersection)
- Scaling factors for converting raw values to physical units
In the decompiled code, a map lookup function typically appears as a series of array index calculations, interpolation between neighboring cells, and a final scaled output value. Once you identify one map lookup routine, you can find all calibration maps by tracing cross-references to that function.
Pattern Recognition for Map Structures
Bosch ECU firmware follows consistent patterns for calibration data storage. Maps are usually stored in a contiguous calibration area within PFLASH, often in the upper address range. Look for:
- Repeating data structures: Map headers with size, axis lengths, and data pointers follow a predictable format.
- Value ranges: RPM axis values typically range from 0-8000 in increments of 200-500. Load values range from 0-100% or 0-2000 mg/stroke.
- Byte patterns: 16-bit unsigned integers stored in little-endian format dominate calibration data.
Understanding these patterns accelerates Ghidra ECU analysis significantly. Once you identify the calibration region boundaries, you can define data types for entire map structures, making the firmware much more readable. For information on how these calibration values interact with checksum protection, see our ECU Checksum and CRC Algorithms guide.
Ghidra Scripting for ECU Analysis Automation
Manual analysis of 4,000+ functions is impractical. Ghidra’s scripting API (GhidraScript) allows you to automate repetitive tasks and build ECU-specific analysis tools.
Useful Scripts for ECU Work
Map finder script: Search for the calibration map lookup function signature, then enumerate all cross-references to build a complete list of every map and curve in the firmware. Export the results as a CSV with addresses, axis sizes, and data locations.
Function renamer: If you have a reference database from a previously analyzed firmware version, write a script that matches function signatures (byte patterns or call graphs) and automatically applies known names to the new binary.
Register label script: TriCore peripheral registers (CAN, SPI, ADC, timers) have specific addresses documented in the microcontroller datasheet. A script can label all references to these addresses with their register names, turning cryptic memory accesses into readable hardware interactions like CAN0_MOCTR or ADC0_RESULT.
Checksum locator: Search for CRC-32 polynomial constants (0xEDB88320, 0x04C11DB7) or known Bosch checksum patterns in the binary. This helps locate the checksum verification and correction routines quickly.
Python Integration with Pyhidra
For more advanced automation, Pyhidra (or Ghidrathon) bridges Ghidra’s Java API to Python 3, enabling integration with data science libraries like NumPy and Matplotlib. This is particularly useful for visualizing calibration maps extracted through Ghidra ECU analysis, plotting map surfaces in 3D, or comparing calibration differences between firmware versions.
BSim for Cross-Binary Comparison
Ghidra’s BSim (Binary Similarity) feature is exceptionally powerful for ECU work. BSim uses function-level feature hashing to find similar functions across different binaries, even when the code has been recompiled with different optimization settings or for different microcontroller variants.
Practical ECU applications of BSim:
- Version diffing: Compare two firmware versions of the same ECU to identify exactly which functions changed. This reveals calibration updates, bug fixes, or security patches between software releases.
- Cross-platform analysis: If you have fully analyzed a MED17.1 firmware, BSim can transfer function names and annotations to a MED17.5 binary, even though the specific calibration data differs. The core code structure remains similar across variants.
- Known function identification: Build a BSim database of identified functions (CRC routines, seed-key algorithms, UDS handlers) and automatically match them in new firmware binaries. This creates a reusable knowledge base that accelerates every subsequent analysis.
BSim works remarkably well on Bosch ECU binaries because the auto-generated code from model-based design tools produces consistent function structures across firmware versions. For understanding the security algorithms BSim can help identify, see our Seed-to-Key Reverse Engineering guide.
Practical Workflow: Analyzing a Bosch MED17 Firmware
Here is a complete Ghidra ECU analysis workflow for a typical Bosch MED17 firmware binary:
- Obtain the firmware through JTAG, boot mode, or OBD-based extraction. See our ECU Firmware Extraction Methods guide for detailed procedures.
- Create a Ghidra project and import the raw binary with TriCore:LE:32:default language. Set base address to
0x80000000. - Configure the memory map with PFLASH, DFLASH, DSPR, PSPR, and peripheral register regions.
- Locate the entry point at the Boot Mode Header and disassemble. Let auto-analysis run (20-30 minutes).
- Run register labeling scripts to annotate peripheral register accesses.
- Identify key functions starting from interrupt vectors, string references, and known address patterns.
- Locate calibration maps by finding the map lookup function and tracing its cross-references.
- Use BSim to transfer knowledge from previously analyzed firmware versions.
- Document findings using Ghidra’s commenting and bookmarking features. Export annotated listings for team review.
This workflow, combined with knowledge from our Advanced ECU Firmware Reverse Engineering Methodology, provides a complete framework for professional-grade ECU analysis.
Working on a complex ECU firmware project? Whether you need full firmware disassembly, calibration map extraction, or security algorithm analysis, our team delivers results. Get in touch for professional ECU analysis support.
Advanced Techniques and Tips
Handling Multi-Core AURIX Firmware
Newer AURIX TC2xx and TC3xx processors are multi-core, with up to 6 TriCore CPUs. Each core runs different parts of the ECU software: Core 0 typically handles the operating system and diagnostics, Core 1 runs the main engine control algorithms, and Core 2 handles auxiliary functions. When performing Ghidra ECU analysis on multi-core firmware, you may need to split the binary into per-core segments or analyze them together with careful attention to which core executes each function.
Dealing with Encrypted or Protected Firmware
Some newer ECU platforms use encrypted calibration areas or code signing. If the firmware dump contains encrypted sections, you will see high-entropy data blocks where you expect readable code or calibration data. Analyzing the boot loader and flash programming routines in Ghidra often reveals the decryption keys or algorithms, since the ECU itself must decrypt the data at runtime.
Integrating Ghidra with WinOLS
Many tuning professionals use WinOLS for calibration map editing. The map locations and definitions identified through Ghidra ECU analysis can be exported and imported into WinOLS as map packs (A2L/DAMOS format). This bridges the gap between deep firmware analysis and practical calibration work.
Conclusion
Ghidra has transformed automotive ECU firmware analysis from an expensive, specialist activity into an accessible discipline. Its TriCore decompiler, scripting capabilities, and BSim comparison tool make it the most capable free platform for understanding how modern engine management systems work at the code level.
The key to effective Ghidra ECU analysis is preparation: configure the correct memory map, identify the entry point, and build a library of reusable scripts and BSim databases. Each firmware you analyze adds to your knowledge base, making subsequent projects faster and more productive. Start with well-documented ECU families like the Bosch MED17/EDC17, where community resources and reference data are available, and expand to less-documented platforms as your skills develop.
As automotive ECUs grow more complex with multi-core AURIX processors, encrypted firmware, and AUTOSAR-based software architectures, the demand for skilled ECU reverse engineers continues to increase. Mastering Ghidra is the most effective way to build that expertise.
Let's Work Together
Need Professional Assistance with Reverse Engineering or Cybersecurity Solutions? Our Team is Ready To Help You Tackle Complex Technical Challenges.